
A step by step guide to recording a building
First, the essential safety bit!
- Never work alone (unless you are surveying your own house!)
- Teams of 3 or 4 are ideal; 2 to hold and read measuring tapes, 1 to write down, and 1 to gain information from the occupants of the house
- Make sure you have the owner’s permission and do everything possible to avoid damaging the property
- Always work safely. Don’t climb unless necessary. Use the correct equipment for the purpose. Check loft ladders are safe before using. Wear a hard hat in a loft or empty building. Never enter a building which is derelict unless you know it has a sound structure
Consider how you wish to record the building before you begin.
The ideal survey will consist of measured drawings, written description and photographs. If drawings are not possible, then consider a thorough written description with a full set of photographs.
Equipment
- Long measuring tapes. 30m is perfect
- Short hand tapes
- Folding rule (2-3m)
- A4 clipboards and plenty of paper
- Soft pencils with erasers
- Pencil sharpener
- Peg or skewer for fixing the end of the tape when measuring outside
- Chalk
Drawing the ground plan
- Sketch the ground lay-out of the building in rough, but large and clear enough to add measurements. It should fit on one A4 page! Include doorways, windows, fireplaces, walls, overhead beams (in broken line). A plan is normally done at waist height or thereabouts. Begin with the ground floor and then do upstairs.
- Now begin measuring room by room. Starting at one corner, one member holds the long tape at zero, whilst the second moves along the wall stopping at significant points to read out the measurement to the third person. Take these running measurements over as long a stretch as possible, i.e. until there is a turn in a wall.
- It is usual to begin at the left-hand end of each wall and work clockwise, starting at zero on each corner.
- If something sticks out into the room, such as a chimney breast, measure in front of it first. Then return and measure its depth using a hand tape.
- Marking the measurements onto the sketch needs care! Start with a zero, showing which direction you are measuring. Write each measurement at right angles to the point it was taken. Write 1.05 for 1 metre 5 centimetres or 0.86 for 86 centimetres.
- Remember to measure wall thicknesses both from inside to outside and between rooms. This can be done through an open window or by carrying measurements through from one room to the next.
- Unless the room has definite right angled corners (few rooms have!), you will need to take diagonal measurements as well. And consider whether any walls bow out or bend in; if so, you will need to set up a straight string line and measure from it at right angles to ascertain the curve of the wall.
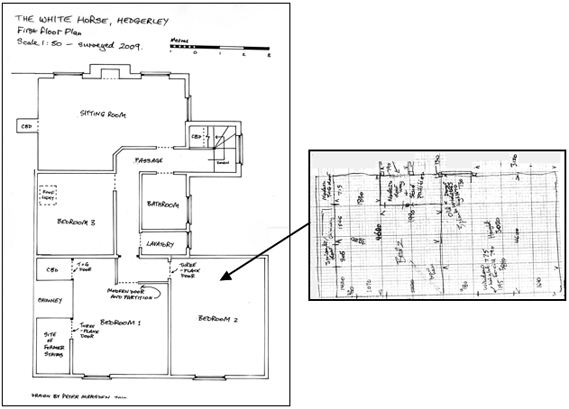
Example of a first floor sketch (right) with the finished scale drawing of the whole floor plan
Upper floors
- It is not always necessary to measure upper floor plans because internal walls and chimneys are often directly above those on the ground floor. It may be possible therefore to add variations onto a plan drawn to ground floor measurements. In the case of a jettied building, a new plan will be required, since the upper floor will differ in size to that of the ground floor.
- Remember to check upper outer wall thicknesses as these may vary above the level of the floor joists.
Elevations
Consider whether an elevation drawing is required; a photograph might be enough for a simple building. If doing an elevation drawing, a different team might be used, if sufficient members are available.
- Begin as before with a sketch plan, but try to get proportions correct because vertical measuring can be tricky.
- It is generally helpful to set up a level string line across the front of the building, from which to measure upwards and downwards.
- The sketch plan should record door and window openings, breaks in walling, plinths, parapets.
- It is possible to produce a sketch by counting brick courses, which will give reasonably accurate dimensions (for a brick building obviously!!)
- To measure heights you will need to use a rod but for some tall buildings you may need to drop a tape down from an upper window and use a rod to reach up to the eaves. If you really cannot reach to measure, then make a decent estimate by, for example, counting brick courses or using the known height of features such as windows as a guide.
- If other elevations are significant, they will need recording as well as the front.
A timber-framed building will require a lot more work! The positions of upright posts should be marked on the plan. The elevation will need to show the relationships between horizontal and vertical timbers, position and sizes of bracing timbers and positions of doors and windows.
Roofs
- Roofs are normally drawn in cross-section. In sketching a roof section, draw a truss as seen from straight on, ignoring everything behind. Anything in front, coming towards you, should be drawn in a broken line.
- If there is a principle truss, this is what should be sketched first.
- For a section, stretch a tape across the floor from one side to the other and measure all the horizontals off it, using a rod to identify the position of upper parts along the tape. Use the running measurement method as before.
- Now leave the tape in position on the floor and measure verticals up from it with a rod or steel tape, at each point identified on the horizontal plane.
- It may also be helpful to measure the depth of a blade top and bottom and a diagonal length.
- Record these measurements on your sketch perpendicular to that direction. You may wish to make two sketches, one for the vertical measurements and one for the horizontal.
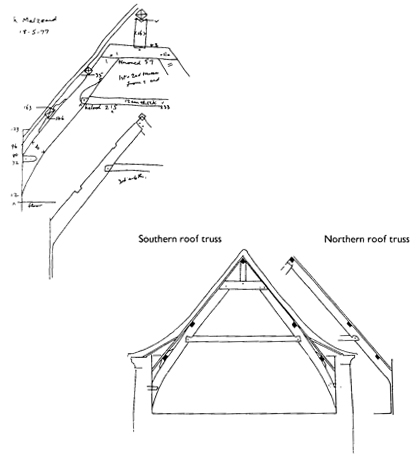
Sketch plan and drawn section of roof truss
This completes the basic recording process but there is a lot more to do!
The sketches need to be turned into scale drawings, photographs need to be taken and a report needs to be completed.
There are separate guides to drawing up and report compilation.
Reference
Hutton, B. 1986. Recording Standing Buildings. The British Archaeological Trust
Sue Fox
November 2009